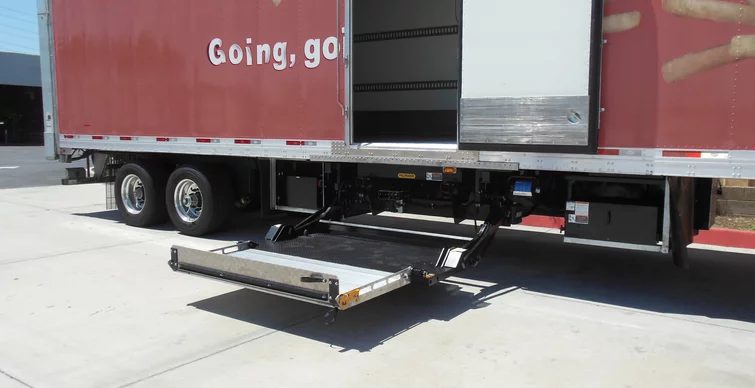
ILSL
ILSL Product Support
PALFINGER has built a reputation as a market leader in technical support and lifetime product service. This also rings true with the ILSL liftgate. Whether you need help through our service network or our dedicated Technical Service Team, PALFINGER will ensure your equipment stays up and running. PALFINGER products feature heavy-duty, hardened and corrosion-protected pins with low-maintenance greaseable bushings. The power packs are equipped with thermo-switch-protected motors and extra heavy-duty solenoids.
PRODUCT SPECIFIC TROUBLESHOOTING
Keeping your equipment up and on the road is priority number one. When using our troubleshooting guide with assistance from our dedicated technical service team, you can feel confident that your liftgate will be repaired correctly and in a timely fashion.
NOTE: Always use a digital voltmeter when checking voltage to determine if you have sufficient power to operate the liftgate.
Before troubleshooting, please ensure that the battery voltage is above 12.5 Volts, that all batteries have been load tested, and that connections are cleaned and connected correctly.
The next quick check is to perform a 10 -10 test.
10-10 Test: Check battery voltage 10-10 test using a multimeter set on DC voltage: open the liftgate and raise it to bed level. Attach negative voltmeter lead to the negative post on the motor. Attach the positive voltmeter lead to the positive post on the motor. Activate the raise switch to the deadhead motor. Keep the switch activated for 10 seconds. The voltmeter should read 10 volts or more after 10 seconds. If you have less than 8 volts, the batteries are low. Charge batteries and retest. If the results are the same, do the batteries need to be replaced? Do you have clean, corrosion-free connections? Is the circuit grounded properly?
Once the test has passed, jump both big posts on the motor solenoid to see if the motor runs. If the motor runs and the liftgate lifts, this is good and means all hydraulic valves and components are working correctly. If the liftgate tilts, the hoses are backward. Next, please make sure that all electrical components are in good working order, like circuit breakers at battery connections and fuses at batteries and the circuit board.
LIFTGATE IS NOT LOWERING
Check Battery Power
- Check if the cab switch is ON
- Check the resettable circuit breaker on top of the batteries
▶ Push the reset tab back in; if popped out
- Check the condition of the ground cable on the driver side attached to the gate frame and trailer/truck body.
- Check the fuse on the top of batteries (qty 1) at the pump and motor inside of the main tube on the passenger side at the circuit board (qty 2) behind the rubber cover
- Check the power on the board between J-11 #4 and "Masse" with a voltmeter by turning the lift-up knob and holding for 10 seconds with the gate in stored position (DEADHEAD GATE)
- Above 10-Volt is necessary for proper use of the liftgate
▶ Less than 10V ▶ Continue to 6
- Test for charge batteries and a solid working truck/trailer charging system
- Check the ground connection from the front of the trailer/truck to the batteries and liftgate
▶ Check for tight connections
Liftgate is Not Lowering but Lifting and Sliding
- If the liftgate has not been used and stored under the trailer and all other functions except for lowering are working, the pins and bearing might be frozen. While activating the switches and lowering the gate, pry down the platform or place a load not to exceed the capacity of the gate on the platform.
▶ If the gate is now lowering, your pins are frozen and need cleaning and lubrication
Check for Short in Optional Equipment
- Unplug J-3 (lights and f/c)
▶ Keep the connectors unplugged—the gate will operate without plugs connected
- Unplug J-1 (main power)
▶ Wait 10 seconds and plug J-1 back into the board —resetting the board
- Plug each connector back one at a time and check the functions of the gate after plugging in each
Check the Voltage Supply to the Release Valves on the Lift Cylinders
- Check the voltage between ground JK #(-) and J4 #15 (release valves S1 and S2 at the lift cylinders) and J1 #12 (lock valve S11 and shift valve S5) while turning the lowering knob
- No voltage ▶ Check for a bad knob or loose wire at the control panel
- Listen for clicking of the release valves at the lift cylinders (inner cylinders)
▶ If valves are not clicking ▶ Check the wire for damaged spots or loose connections
Gate is Lowering Down Very Slowly, S5 at Pump not Engaged
- Check the voltage at J1 #12 and ground JK #(-) while turning the knob to engage the shift valve at the pump and motor inside the main tube
- Override the shift valve by pushing down the center brass pin with a small Phillips screwdriver while turning the down knob
▶ Gate will lower down ▶ Check the valve and look for a damaged wire or loose connections

LIFTGATE does not slide out
Check Battery Power
- Check the resettable circuit breaker on top of the batteries
▶ Push the reset tab back in; if popped out
- Check the condition of the ground cable on the driver side attached to the gate frame and trailer/truck body.
- Check the fuse on the top of batteries (qty 1) at the pump and motor inside of the main tube on the passenger side at the circuit board (qty 2) behind the rubber cover
- Test for charged batteries and a solid working truck/trailer charging system
- Check the power on the board between J-11 #4 and JK #(-) with a voltmeter
- Check the ground connection from the front of the trailer/truck to the batteries and the liftgate
- Check for tight connections
Check for a Short in Optional Equipment
- Unplug J-3 (lights and f/c)
▶ Keep the connectors unplugged—the gate will operate without plugs connected
- Unplug J-1 (main power)
▶ Wait 10 seconds and plug J-1 back into the board —resetting the board
- Plug each connector back one at a time and check the functions of the gate after plugging in each
Check the Voltage Supply to Release Valve for Push-Pull Cylinder
- Check the voltage at J-32 #81 and J-42 #81 to ground JK#(-) while turning the slide-out knob to open up the lock valve S8 for the P-P cylinder.
- No Voltage ▶ Check for bad knobs or loose wires in the control box
- Listen for clicking of the release valve for the P-P cylinders (at valve block on mount frame)
- If the valve is not clicking ▶ Check the wire for damaged spots, loose connections or a bad valve
Check the Motor Solenoid Power
- Check the voltage at J-1 #3 and ground JK #(-) while turning knob to engage the motor solenoid
- No voltage ▶ Board might be damaged
- Check the voltage at the small motor solenoid studs and ground JK #(-) while turning the knob and listen for clicking of the motor solenoid
- No voltage or clicking ▶ Check the wire to the motor solenoid
- Check for voltage across the small motor solenoid studs with test light while turning the knob
- See a light ▶ Power is reaching the solenoid
- Check for main power at the big solenoid studs
- One has voltage; if not, check the connections to the battery or popped tab at the circuit breaker
- Check both big solenoid studs for voltage while turning the slide-out knob
▶ If not ▶ Solenoid is bad
- Jump the large terminals at the motor solenoid
▶ If the motor runs ▶ Motor solenoid is bad
▶ If the motor does not run ▶ Bad motor or bad ground
- Check for loose hanging cable on the driver's side
▶ Tap on the motor ▶ Motor starts running—bad brushes
LIFTGATE is not lifting up
Check Battery Power
- Check the resettable circuit breaker on top of the batteries
▶ Push the reset tab back in; if popped out
- Check the condition of the ground cable on the driver side attached to the gate frame and trailer/truck body.
- Check the fuse on the top of batteries (qty 1) at the pump and motor inside of the main tube on the passenger side at the circuit board (qty 2) behind the rubber cover
- Test for charged batteries and a solid working truck/trailer charging system
- Check the power on the board between J-11 #4 and JK #(-) with a voltmeter
- Check the ground connection from the front of the trailer/truck to the batteries and the liftgate
- Check for tight connections
Check the Function of the Control Box
- Check the voltage at J30 #4 to ground JK #(-) for power supply of the control box
- Check the voltage at J30 #5 (lift) to ground JK #(-) for lifting signal
▶ Signal on J30 #5 ▶ Control box is ok; if there is no signal, check for damaged wire or loose connector inside the control box or damaged turn knob
Check for a Short in Optional Equipment
- Unplug J-3 (lights and f/c)
▶ Keep the connectors unplugged—the gate will operate without plugs connected
- Unplug J-1 (main power)
▶ Wait 10 seconds and plug J-1 back into the board —resetting the board
- Plug each connector back one at a time and check the functions of the gate after plugging in each
Check the Motor Solenoid Power to Run the Motor
- Check the voltage at J-1 #3 and ground JK #(-) to engage the motor solenoid while turning lift knob
- Check the voltage at the small motor solenoid studs and ground JK #(-) while turning knob and listen for clicking of the motor solenoid
- No voltage or clicking ▶ Check wire to the motor solenoid
- Check for voltage across the small motor solenoid studs (#3 and - ) with test light while turning the knob
- See a light ▶ Power is reaching the solenoid
- Check for main power at the large solenoid studs
- One has voltage; if not check the connections to the battery
- Check both big solenoid studs for voltage while turning the up knob
▶ If not ▶ Solenoid is bad
- Jump the large terminals at the motor solenoid
▶ If motor runs ▶ Motor solenoid is bad
▶ If motor does not run ▶ Bad motor or bad ground
- Check for loose hanging cable on the driver's side
▶ Tap on the motor ▶ Motor starts running—bad brushes
Check the Voltage Supply to the Release Valve on Lift Cylinder
- Check the voltage between ground JK #(-) and J4 #15 (release valves S1 and S2 at lift cylinders) while turning the lifting knob
- No Voltage ▶ Check for bad knobs or loose wires in the control panel
- Listen for the clicking of the release valves at the lift cylinder (inner cylinders)
- If the valve is not clicking ▶ Check the wire for damaged spots or loose connections
- Jump J-11 #2 to J4 #15 for about 8-10 minutes—if coils on lift cylinders are cold, look for a broken wire
Gate Does Not Slide In
Check Battery Power
- Check the resettable circuit breaker on top of the batteries
▶ Push the reset tab back in; if popped out
- Check the condition of the ground cable on the driver side attached to the gate frame and trailer/truck body.
- Check the fuse on the top of batteries (qty 1) at the pump and motor inside of the main tube on the passenger side at the circuit board (qty 2) behind the rubber cover
- Test for charged batteries and a solid working truck/trailer charging system
- Check the power on the board between J-11 #4 and JK #(-) with a voltmeter
- Check the ground connection from the front of the trailer/truck to the batteries and the liftgate
- Check for tight connections
Check for a Short in Optional Equipment
- Unplug J-3 (lights and f/c)
▶ Keep the connectors unplugged—the gate will operate without plugs connected
- Unplug J-1 (main power)
▶ Wait 10 seconds and plug J-1 back into the board —resetting the board
- Plug each connector back one at a time and check the functions of the gate after plugging in each
Check the Function of the Control Box
- Check the voltage at J-32 #80 and J-42 #80 ground JK #(-) while turning the slide-in knob to open up the lock valve S7 for the P-P Cylinder
- No voltage ▶ Check for a bad knob or loose wire in the control box
- Listen for the clicking of the lock valve for the P-P cylinders (at the valve block on the mount frame)
- If the valve is not clicking ▶ Check the wire for damaged spots, loose connections or a bad valve
Check the Motor Solenoid Power to Run the Motor
- Check the voltage at J-1 #3 and ground JK #(-) to engage the motor solenoid while turning lift knob
- Check the voltage at the small motor solenoid studs and ground JK #(-) while turning the knob and listen for clicking of the motor solenoid
- No voltage or clicking ▶ Check the wire to the motor solenoid
- Check for voltage across the small motor solenoid studs (#3 and - ) with test light while turning the knob
- See a light ▶ Power is reaching the solenoid
- Check for main power at the large solenoid studs
- One has voltage; if not check the connections to the battery
- Check both big solenoid studs for voltage while turning the up knob
▶ If not ▶ Solenoid is bad
- Jump the large terminals at the motor solenoid
▶ If motor runs ▶ Motor solenoid is bad
▶ If motor does not run ▶ Bad motor or bad ground
- Check for loose hanging cable on the driver's side
▶ Tap on the motor ▶ Motor starts running—bad brushes


